21-p-002
Disclaimer and Conditions Regarding Use of SWGDE Documents:
SWGDE documents are developed by a consensus process that involves the best efforts of relevant subject matter experts, organizations, and input from other stakeholders to publish suggested best practices, practical guidance, technical positions, and educational information in the discipline of digital and multimedia forensics and related fields. No warranty or other representation as to SWGDE work product is made or intended.
As a condition to the use of this document (and the information contained herein) in any judicial, administrative, legislative, or other adjudicatory proceeding in the United States or elsewhere, the SWGDE requests notification by e-mail before or contemporaneous to the introduction of this document, or any portion thereof, as a marked exhibit offered for or moved into evidence in such proceeding. The notification should include: 1) The formal name of the proceeding, including docket number or similar identifier; 2) the name and location of the body conducting the hearing or proceeding; and 3) the name, mailing address (if available) and contact information of the party offering or moving the document into evidence. Subsequent to the use of this document in the proceeding please notify SWGDE as to the outcome of the matter. Notifications should be sent to secretary@swgde.org.
From time to time, SWGDE documents may be revised, updated, or sunsetted. Readers are advised to verify on the SWGDE website (www.swgde.org) they are utilizing the current version of this document. Prior versions of SWGDE documents are archived and available on the SWGDE website.
Redistribution Policy:
SWGDE grants permission for redistribution and use of all publicly posted documents created by SWGDE, provided that the following conditions are met:
- Redistribution of documents or parts of documents must retain this SWGDE cover page containing the Disclaimer and Conditions of Use.
- Neither the name of SWGDE nor the names of contributors may be used to endorse or promote products derived from its documents.
- Any reference or quote from a SWGDE document must include the version number (or creation date) of the document and also indicate if the document is in a draft status.
Requests for Modification:
SWGDE encourages stakeholder participation in the preparation of documents. Suggestions for modifications are welcome and must be forwarded to the Secretary in writing at secretary@swgde.org. The following information is required as a part of any suggested modification:
- Submitter’s name
- Affiliation (agency/organization)
- Address
- Telephone number and email address
- SWGDE Document title and version number
- Change from (note document section number)
- Change to (provide suggested text where appropriate; comments not including suggested text will not be considered)
- Basis for suggested modification
Intellectual Property:
Unauthorized use of the SWGDE logo or documents without written permission from SWGDE is a violation of our intellectual property rights.
Individuals may not misstate and/or over represent duties and responsibilities of SWGDE work. This includes claiming oneself as a contributing member without actively participating in SWGDE meetings; claiming oneself as an officer of SWGDE without serving as such; claiming sole authorship of a document; use the SWGDE logo on any material and/or curriculum vitae.
Any mention of specific products within SWGDE documents is for informational purposes only; it does not imply a recommendation or endorsement by SWGDE.
1. Purpose
2. Scope
This document will provide a recommendation of the equipment needed and a detailed approach to lighting techniques for photographing evidence.
If the images captured will be used for comparative analysis, please consult the SWGDE Guidelines for Capturing Latent Impressions Using a Digital Camera in the Field or the SWGDE Guidelines for the Digital Imaging of Footwear and Tire Impressions.
3. Equipment
Please reference SWGDE Photographic Equipment and Infrastructure Recommendations prior to implementation of new equipment or procedures.
- Digital Single Lens Reflex Camera (DSLR) or Mirrorless Interchangeable-Lens Camera (MILC)
- Lenses
- Polarizing filters
- Tripod or copy stand
- Shutter release cable
- Light source(s) (e.g., Incandescent, Fluorescent, Fiber Optic, Adjustable)
- Light or dark paper
- Photo light tent
- Translucent surface
- Mirror
- Clear glass – various sizes
- Clamps – to secure your medium (e.g., Mirror, Paper, Glass, etc.)
4. Procedures
4.1 Copy Stand / Direct Lighting
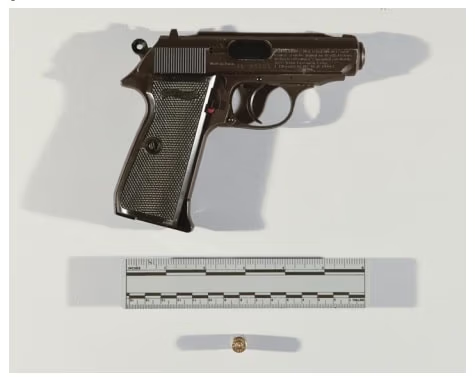
4.1.1 Useful for general documentation photographs and some evidentiary close ups.
4.1.2 Direct lighting is normally set up with two to four lights on each side of the camera. The lights should be equally balanced to provide even illumination across the surface of the item being photographed. Each light source should be set at approximately a 45-degree angle to the surface of the item. Setting the lights at this angle to the surface of the item will avoid any reflection of light from the surface. Adjusting the angle of the light above and below the 45-degree can have an effect on the contrast between the item and anything on the item (i.e., impression evidence). The goal with this technique is to have even illumination and to avoid any glare or as much glare as possible from reflecting off of the surface.
4.1.3 Setup:
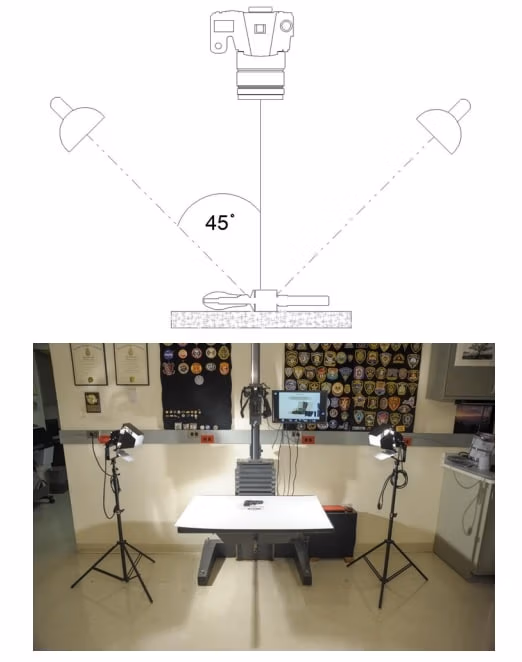
4.1.4 Example:
4.2 Oblique Lighting
4.2.1 Useful for impressions, indented writing, and highlighting texture.
4.2.2 Position a light source to the side of the item being photographed. The light should be positioned at a low enough height/angle to cast a shadow into the subject (i.e., ridges in an impression). Adjust the angle of the light as necessary to produce the appropriate contrast. A bounce card or an additional light source opposite the original light source may be used to fill in shadows if necessary. It is recommended that multiple images be captured, lighting the detail from multiple sides (i.e., footwear: Light from side to side then move the lighting to light toe to heel).
4.2.3 Setup:

4.2.4 Example:

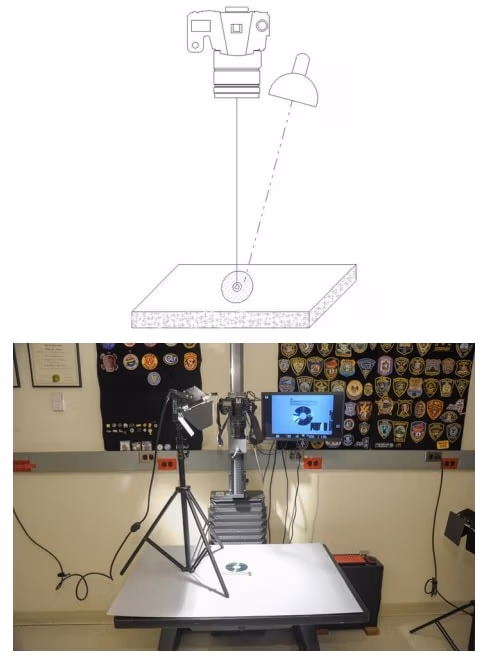
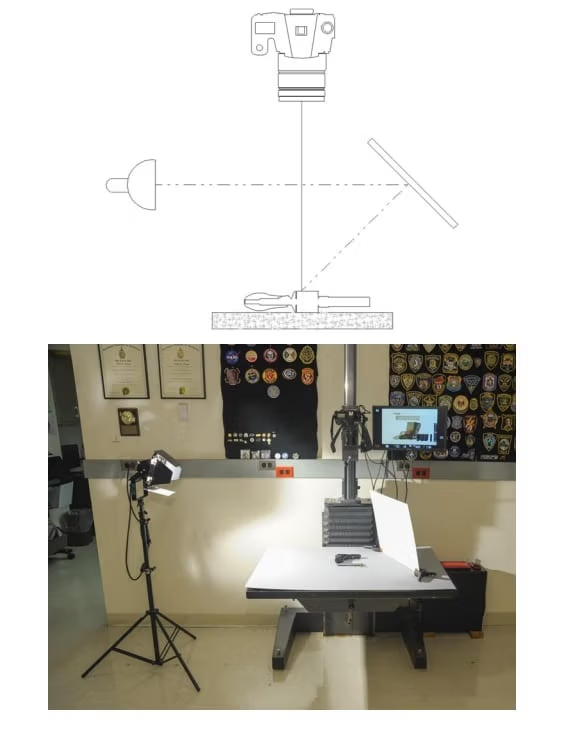
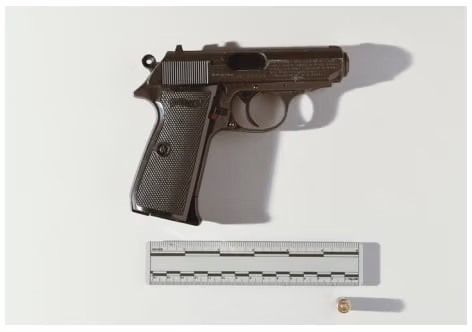
4.3 Axial Lighting
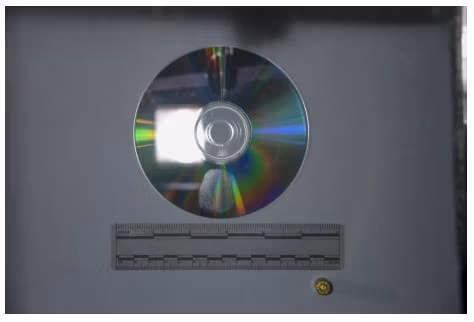
4.3.1 Useful for capturing details on flat reflective surfaces (i.e., mirrors, plastics and glossy paper items). Also useful for photographing items where it may be difficult to position a light source and for items with double surfaces, such as mirrors.
4.3.2 Position a light source off to the side of the camera at a 90° angle from the axis of the camera lens. Then position a piece of optically clear glass (i.e., a beamsplitter) in the axis of the camera lens at the same height as the light source. Beginning at a 45° angle, position the glass to direct the light onto the subject. Axial lighting may be diffused if the light is brighter in the center of the viewfinder or captured image, by placing a diffuser between the light source and the glass. Adjust the distance between the diffuser and light source to control the amount of diffusion.
4.3.3 Setup:

4.3.4 Example:
4.4 Transmitted Lighting
4.4.1 Useful for photographing an area of interest (e.g., latent print on tape) on transparent or translucent surfaces or to illustrate the translucence of the object.
4.4.2 Position the light source behind the subject and direct the illumination through the subject and toward the camera. Place a diffuser between the illuminator and the subject. If additional details are not visible with this set up alone (i.e., a paper scale on the surface of the item), consider using this technique in conjunction with direct lighting, or utilizing a small light source to illuminate the additional area.
4.4.3 Setup:
4.4.4 Example:
4.5 Diffused Lighting
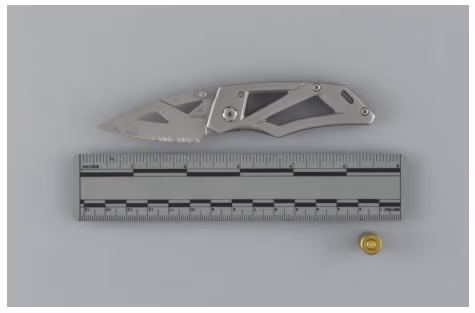
4.5.1 Useful for photographing highly reflective subjects.
4.5.2 This technique is similar to copy stand lighting (above), with the addition of diffusion material positioned between the lights and the subject. Any sufficiently maneuverable lighting apparatus that has a translucent material covering the light source will work. When using a light that does not have a translucent covering, translucent plexiglass or even a piece of paper can serve as a diffuser. When introducing a diffuser, such as a piece of paper, place the diffuser approximately six to twelve inches away from the light source to ensure even lighting. The diffuser should provide an even illumination of the entire item being photographed. Adjust the distance between the diffuser and light source to control the amount of diffusion.
4.5.3 Setup:

4.5.4 Example:
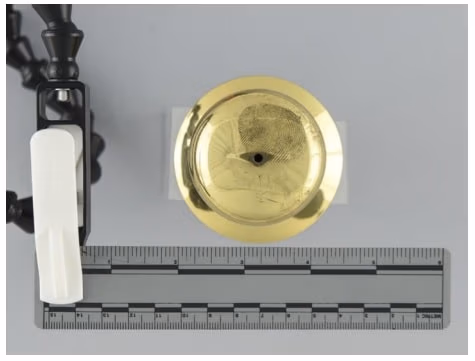
4.6 Tented Lighting
4.6.1 Useful for photographing highly reflective objects as well as reflective cylindrical objects (e.g., firearm barrels, bats, pipes).
4.6.2 Light tents are commercially available however, one can be manufactured using translucent material. Place the item inside the enclosure and position the lights so they illuminate the enclosure from the inside or out, but do not directly light the subject. The light will reflect off of the enclosure and back onto the item being photographed. The camera lens should be aimed through a small opening in the enclosure. On flat reflective surfaces a dark circle may appear in the center of the item. On concave or convex surfaces, there may be a narrow dark line in the center of the item. The camera lens causes this dark circle or dark line as the camera lens does not reflect any of the light. To prevent this dark circle or line, it may be necessary to position the item being photographed at a slight angle to the camera lens. Positioning the item at a slight angle will require additional depth of field and may affect an impression from being successfully run in certain programs (i.e., AFIS entry).
4.6.3 Setup:

4.6.4 Example:
4.7 Direct Reflection
4.7.1 Useful for photographing an area of interest on flat, reflective surfaces.
4.7.2 Position the subject at a narrow angle from the camera lens. Positioning the item at a slight angle will require additional depth of field and may affect an impression from being successfully run in certain programs (i.e., AFIS entry). Place a light source in close proximity to the camera body and aim the light at the subject to reflect straight up into the camera lens this will appear as a bright hot spot. This technique requires a hotspot to be placed directly on the area of interest (i.e., friction ridge detail) to be photographed; for even illumination that light source may need to be diffused. Adjustments can be made to the light source and diffuser until ideal results are accomplished.
4.7.3 Setup:
4.7.4 Example:

4.8 Bounce Lighting
4.8.1 Useful for photographing flat reflective surfaces where some diffusion is necessary. Also useful for filling in shadows on single light setups.
4.8.2 Using a bounce card or other light reflective medium (e.g., white card, paper, etc.) reflect light from the primary light source onto the subject.
4.8.3 Setup:
4.8.4 Example:
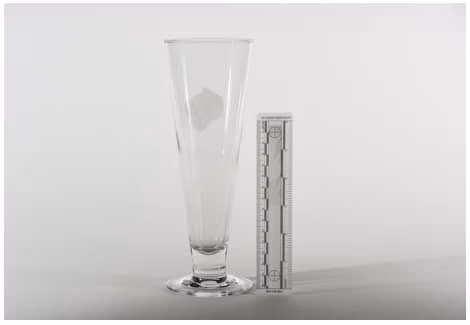
4.9 Lightfield, Brightfield
4.9.1 Useful for photographing translucent subjects with dark material on them (e.g., fingerprints, footwear impressions). Also useful for creating shadow free backgrounds. The area of interest will appear darker on a bright background. Similar to transillumination but allows for lighting the subject as well as the background.
4.9.2 Using a light-colored background, such as white paper, position the item above the background on transparent glass. Aim the lights toward the background. If the item or scale is too dark, reposition the lights so that the light falls on both the item and background, or use additional lights to brighten the item.
4.9.3 Setup:
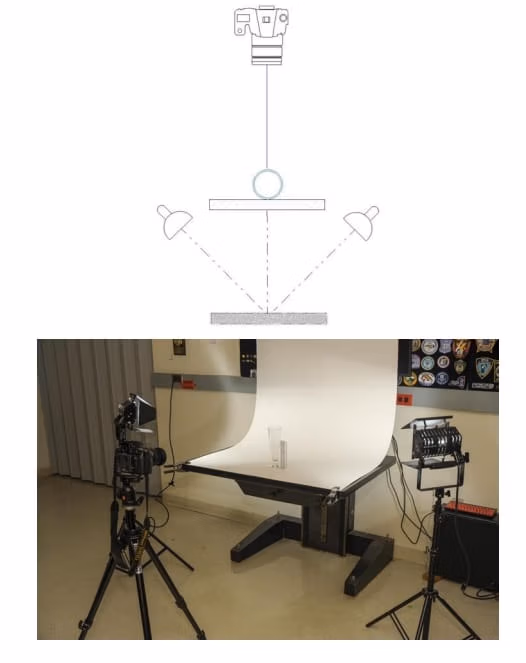
4.9.4 Example:
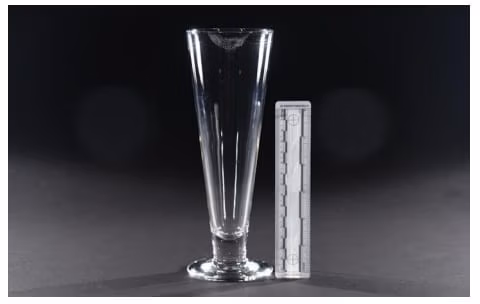
4.10 Darkfield
4.10.1 Useful for translucent subjects with light materials (scratches) on them. The subject will appear brighter on a dark background.
4.10.2 Using a dark colored background, such as black paper, position the item above the background on a transparent glass. Position the lights so that they illuminate the subject from below, but do not point into the lens. If additional illumination is desired on the item or scale, use additional light to illuminate the item.
4.10.3 Setup:
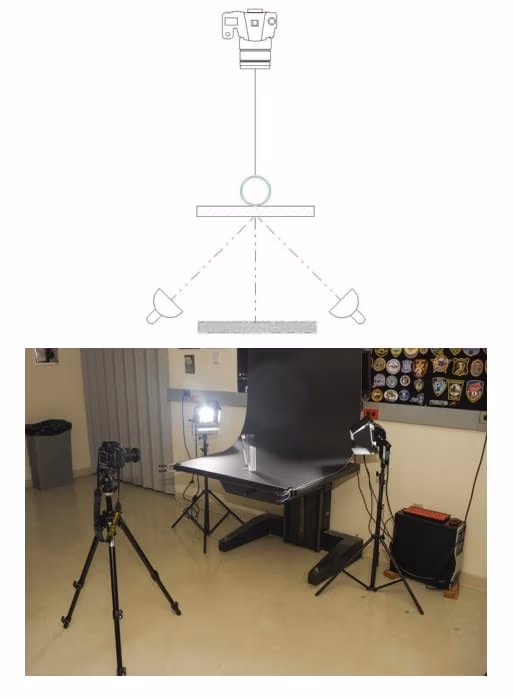
4.10.4 Example:
4.11 Polarization
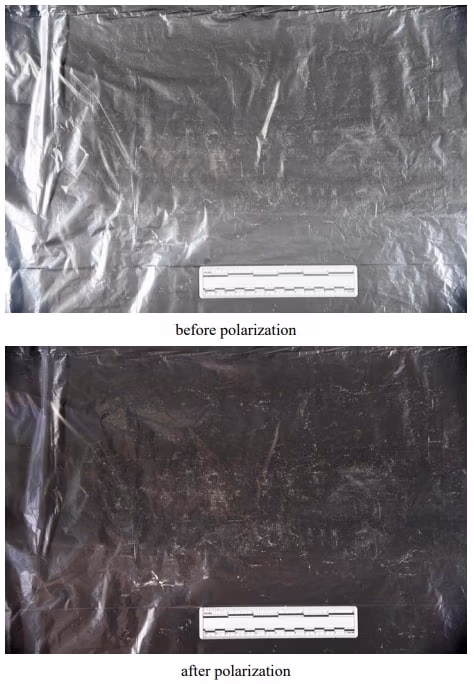
4.11.1 Useful for controlling light on reflective surfaces. This technique can also minimize glare from the item as well as enhance details on some surfaces.
4.11.2 This technique is similar to copy stand lighting (above), with the addition of polarizing filters positioned between the two lights and the subject as well as a polarizing filter on the camera lens. Rotate the filter over the lens to see the change in polarization.
4.11.3 Setup:
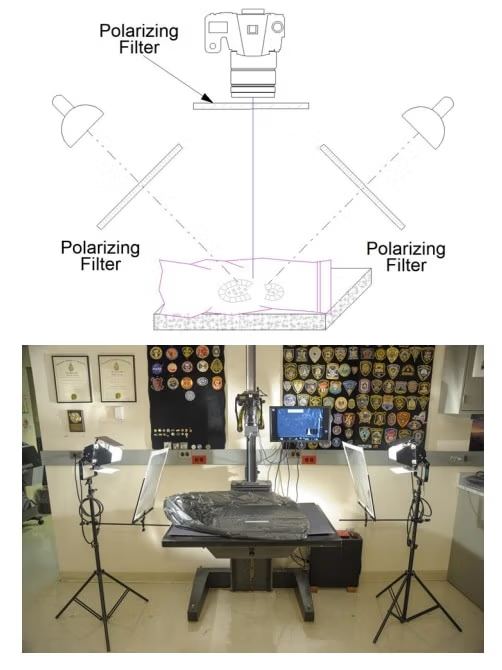
4.11.4 Examples:
5. References
- NCFS National Center Forensic Science Fingerprint Manual v.6 Fingermark Detection & Enhancement (June 2012)
History
| Revision | Issue Date | Section | History |
|---|---|---|---|
|
1.0 DRAFT |
2021-09-16 |
|
Initial draft created, released for public
comment |
|
1.0 |
2022-06-09 |
|
No comments received, released as a final
publication |
Version: 1.0 (June 9, 2022)