21-P-001
Disclaimer and Conditions Regarding Use of SWGDE Documents:
SWGDE documents are developed by a consensus process that involves the best efforts of relevant subject matter experts, organizations, and input from other stakeholders to publish suggested best practices, practical guidance, technical positions, and educational information in the discipline of digital and multimedia forensics and related fields. No warranty or other representation as to SWGDE work product is made or intended.
As a condition to the use of this document (and the information contained herein) in any judicial, administrative, legislative, or other adjudicatory proceeding in the United States or elsewhere, the SWGDE requests notification by e-mail before or contemporaneous to the introduction of this document, or any portion thereof, as a marked exhibit offered for or moved into evidence in such proceeding. The notification should include: 1) The formal name of the proceeding, including docket number or similar identifier; 2) the name and location of the body conducting the hearing or proceeding; and 3) the name, mailing address (if available) and contact information of the party offering or moving the document into evidence. Subsequent to the use of this document in the proceeding please notify SWGDE as to the outcome of the matter. Notifications should be sent to secretary@swgde.org.
From time to time, SWGDE documents may be revised, updated, or sunsetted. Readers are advised to verify on the SWGDE website (www.swgde.org) they are utilizing the current version of this document. Prior versions of SWGDE documents are archived and available on the SWGDE website.
Redistribution Policy:
SWGDE grants permission for redistribution and use of all publicly posted documents created by SWGDE, provided that the following conditions are met:
- Redistribution of documents or parts of documents must retain this SWGDE cover page containing the Disclaimer and Conditions of Use.
- Neither the name of SWGDE nor the names of contributors may be used to endorse or promote products derived from its documents.
- Any reference or quote from a SWGDE document must include the version number (or creation date) of the document and also indicate if the document is in a draft status.
Requests for Modification:
SWGDE encourages stakeholder participation in the preparation of documents. Suggestions for modifications are welcome and must be forwarded to the Secretary in writing at secretary@swgde.org. The following information is required as a part of any suggested modification:
- Submitter’s name
- Affiliation (agency/organization)
- Address
- Telephone number and email address
- SWGDE Document title and version number
- Change from (note document section number)
- Change to (provide suggested text where appropriate; comments not including suggested text will not be considered)
- Basis for suggested modification
Intellectual Property:
Unauthorized use of the SWGDE logo or documents without written permission from SWGDE is a violation of our intellectual property rights.
Individuals may not misstate and/or over represent duties and responsibilities of SWGDE work. This includes claiming oneself as a contributing member without actively participating in SWGDE meetings; claiming oneself as an officer of SWGDE without serving as such; claiming sole authorship of a document; use the SWGDE logo on any material and/or curriculum vitae.
Any mention of specific products within SWGDE documents is for informational purposes only; it does not imply a recommendation or endorsement by SWGDE.
1. Purpose
The purpose of this document is to provide a guideline for photographing crime scenes with limited or no lighting and scenes where lighting needs to be controlled. This includes available light, flash, laser trajectory, alternate light source (ALS), chemical enhancements, or painting with light.
This document provides a foundation for low light crime scene photography, the equipment needed and techniques. The techniques are not provided in any given order – it is up to the photographer to evaluate the lighting conditions of the scene and choose the appropriate technique. This is not an all-inclusive list; a combination of these techniques may be applied.
2. Limitations
- Equipment availability
- Scene Dependent (size, time of day, location)
- Available Personnel
- Scene Safety (personnel and equipment)
- Ambient Light (technique specific)
- Image Noise
3. Equipment
For general equipment recommendations please see the SWGDE Photographic Equipment and Infrastructure Recommendations prior to implementation of new equipment or procedures.
In addition to the above referenced equipment, additional equipment is dictated by the technique utilized and is listed below.
4. Techniques
4.1 Available Light Photography
- Considerations:
- This technique may be used on a large scene when there is some existing light, and a single flash will not produce a properly exposed photograph of the entire scene.
- Photography Recommendations:
- Camera should be on a stable tripod or other device due to long exposures and a remote shutter release device should be used (e.g., shutter release cable).
- Use manual or aperture priority mode.
- Use the camera’s light meter in matrix/evaluative mode to determine the exposure of the scene.
- After reviewing the image taken, make adjustments and reshoot if necessary.
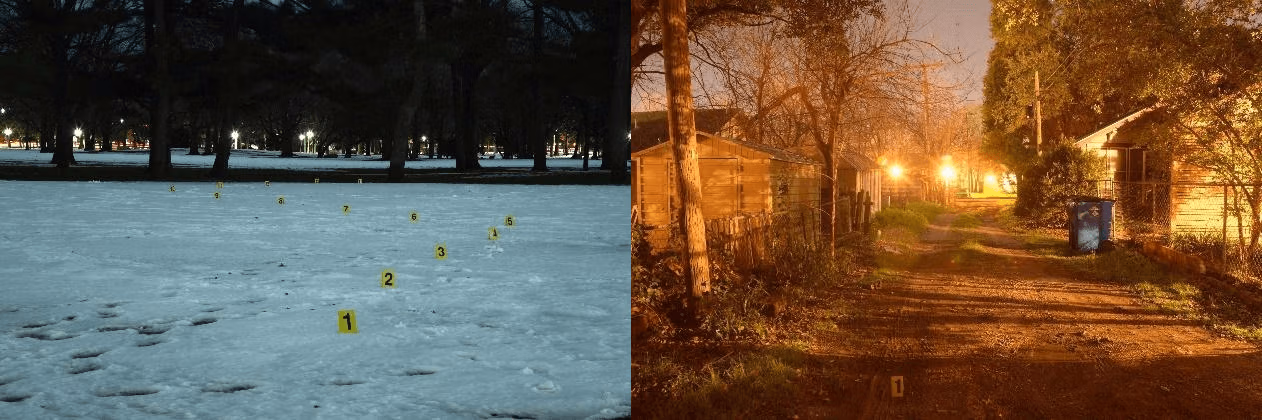
- Examples of available light/long exposure photography:
4.2 Flash
- Considerations:
- Assess the size of the scene and any obstructions within the scene such as vehicles, structures, etc. and determine whether the photograph would require the use of a single flash or multiple flashes.
- Additional Equipment:
- Multiple flashes with sync capability
- Flash sync capabilities
- Photography Recommendations:
- Use Through The Lens (TTL) mode on the flashes.
- Link flashes to camera using a cable or wireless capabilities.
- Be aware of flare/ be cautious that the flashes are not pointed toward the camera.
- After reviewing the image taken, make adjustments and reshoot if necessary.
- Examples of flash photography:
4.3 Painting with Light
- Considerations:
- This is a technique which can illuminate an area that a single flash cannot reach. It utilizes a long exposure while moving a light source through the scene throughout the duration of the exposure.
- This technique is more efficient with at least two people, one to operate the flash and another to operate the camera, however it can be accomplished working independently. A flash or a flood light is the recommended light source, but a flashlight could be used if a flash or flood light is not available.
- Note: The use of flashlights can create narrow light paths and not evenly illuminate an area.
- Additional Equipment:
- Opaque cloth or other material to cover the lens.
- External light source (e.g., flash, floodlight, wide beam flashlight).
- Photography Recommendations:
- Camera should be on a stable tripod or other device due to long exposures and a remote shutter release device should be used (e.g., shutter release cable).
- The exposure mode should be set to manual and the auto focus feature on the camera should be turned off (recommended starting point bulb, f8.0, ISO 400).
- Use flash manual mode at full power.
- While the shutter is open, illuminate the scene using a flash. In between flashes keep the lens covered. and avoid bumping the camera.
- When using a flashlight, begin the exposure and move through the scene illuminating it evenly, then stop the exposure.
- After reviewing the image taken, make adjustments and reshoot if necessary.
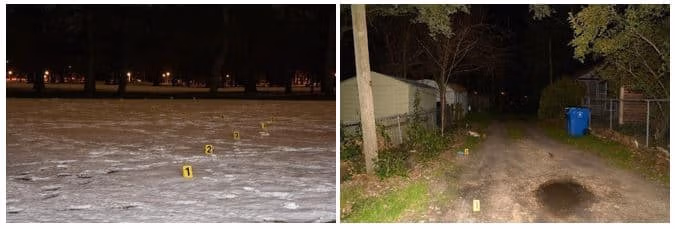
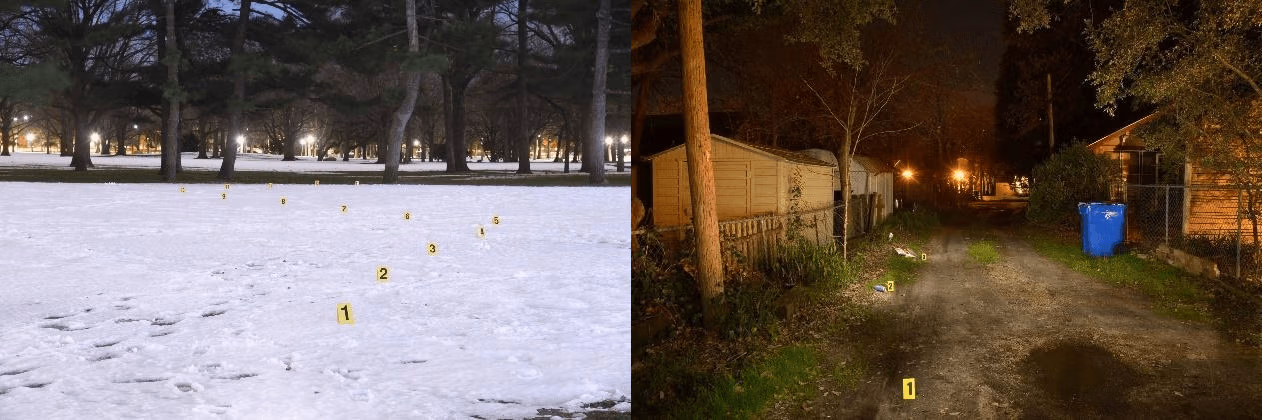
- Examples of painting with light photography:
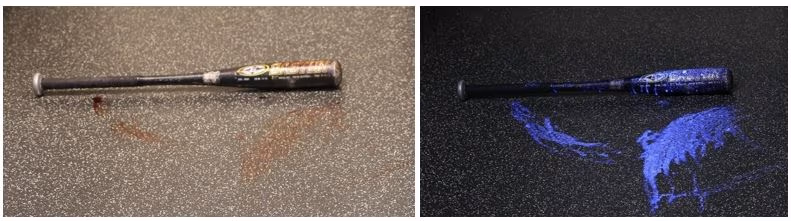
4.4 Alternate Light Source (ALS)/ luminescence
- Considerations:
- This technique is used to document the luminescence of visible light at varying wavelengths when using an ALS or similar light source. This technique may be used to enhance or visualize items of evidence such as fluids, fingerprints, clothing and fibers. This type of light can cause biological stains to luminesce and may be used on treated and untreated objects.
- Additional Equipment:
- ALS.
- Eye protection specific for the wavelength being used (Red, Orange or Yellow).
- Photographic (barrier) filters for the specific wavelength used.
- Photography Recommendations:
- Mount the camera on a tripod or other sturdy device.
- Set the camera to manual or aperture priority mode.
- Attach the photographic filter to the lens as needed.
- Depending upon the strength of the light source, this reaction can be photographed using the camera’s suggested exposure.
- After reviewing the image taken, make adjustments and reshoot if necessary.
- Document the wavelength used and filter combinations.
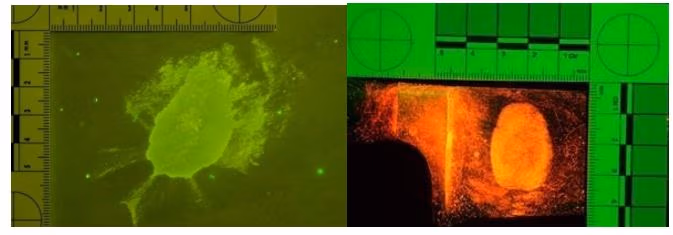
- Examples of Alternate Light Source/ Luminescence photography:

- Additional examples of Alternate Light Source/ Luminescence photography:
4.5 Chemiluminescence
- Considerations:
- Photographing and documenting the areas where the chemical reactions are observed needs to be performed in the absence of ambient light.
- A single flash at the end of the exposure will allow for the background and adjacent areas to be visible/developed.
- Be aware of the safety hazards of the chemicals used and its effects upon evidence.
- Additional Equipment:
- Markers (glow in the dark).
- Black out curtain.
- Appropriate personal protective equipment.
- Photography Recommendations:
- Mount the camera on a tripod or other sturdy device.
- Manually focus on the area of interest.
- Set the camera to manual mode (recommended starting point is 15 seconds at 0 and ISO 400).
- In a darkened room or area, spray the reagent over the area of interest and wait for reaction.
- The area may be resprayed during the exposure.
- A flash may be used at reduced power output at the end of the exposure to illuminate the background.
- After reviewing the image taken, make adjustments and reshoot if necessary.
- Examples of chemiluminescent photography:
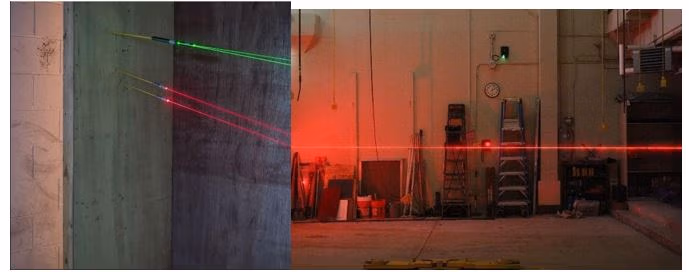
4.6 Laser Trajectory- Projectile Trajectory
- Considerations:
- The reconstruction of a shooting scene can be accomplished by utilizing a laser to determine the path of a projectile. Since the laser is typically not visible unless it comes into contact with a refractive material or surface, the photographer will need to take measures to be able to visualize the laser.
- Additional Equipment:
- Photographic Fog or water mist to refract the laser path so it can be documented.
- White foam core or other sturdy board.
- Neutral Density Filter.
- Opaque cloth or other material to cover the lens.
- Appropriate personal protective equipment.
- Photography Recommendations:
- Mount the camera on a tripod or another sturdy device.
- Place a board on the same plane as the laser trajectory, perpendicular to the camera and manually focus on the laser path.
- Set the camera to manual mode (recommended starting point Bulb, at f8.0, and ISO 400).
- Darken the room.
- Open the camera shutter.
- Trace the laser’s path using either the white board or photographic fog. For additional laser trajectories cover the lens between tracings.
- A flash may be used at reduced power output at the end of the exposure to illuminate the background.
- Close the shutter.
- After reviewing the image taken, make adjustments and reshoot if necessary.
- Examples of laser trajectory photography:
5. References
Alternate Light Source Imaging Forensic Photography Techniques Norman Marin, Jeffrey Buszka 2013
Laser Visualization of Bullet Paths, Evidence Technology Magazine, July/August 2013, Mark Vecellio
History
| Revision | Issue Date | Section | History |
|---|---|---|---|
|
1.0
DRAFT
|
2021-06-17 |
Photography |
Initial draft created and voted by SWGDE for release as a Draft for Public Comment. |
|
1.0 |
2022-01-13 |
Photography |
Document voted for release as final publication |
Version: 1.0 (January 13, 2022)