16-V-002-3.0
Disclaimer Regarding Use of SWGDE Documents
SWGDE documents are developed by a consensus process that involves the best efforts of relevant subject matter experts, organizations, and input from other stakeholders to publish suggested best practices, practical guidance, technical positions, and educational information in the discipline of digital and multimedia forensics and related fields. No warranty or other representation as to SWGDE work product is made or intended.
SWGDE requests notification by e-mail before or contemporaneous to the introduction of this document, or any portion thereof, as a marked exhibit offered for or moved into evidence in such proceeding. The notification should include: 1) The formal name of the proceeding, including docket number or similar identifier; 2) the name and location of the body conducting the hearing or proceeding; and 3) the name, mailing address (if available) and contact information of the party offering or moving the document into evidence. Subsequent to the use of this document in the proceeding please notify SWGDE as to the outcome of the matter. Notifications should be submitted via the SWGDE Notice of Use/Redistribution Form or sent to secretary@swgde.org.
From time to time, SWGDE documents may be revised, updated, or sunsetted. Readers are advised to verify on the SWGDE website (https://www.swgde.org) they are utilizing the current version of this document. Prior versions of SWGDE documents are archived and available on the SWGDE website.
Redistribution Policy
SWGDE grants permission for redistribution and use of all publicly posted documents created by SWGDE, provided that the following conditions are met:
- Redistribution of documents or parts of documents must retain this SWGDE cover page containing the Disclaimer Regarding Use.
- Neither the name of SWGDE nor the names of contributors may be used to endorse or promote products derived from its documents.
- Any reference or quote from a SWGDE document must include the version number (or creation date) of the document and also indicate if the document is in a draft status.
Requests for Modification
SWGDE encourages stakeholder participation in the preparation of documents. Suggestions for modifications are welcome and must be submitted via the SWGDE Request for Modification Form or forwarded to the Secretary in writing at secretary@swgde.org. The following information is required as a part of any suggested modification:
- Submitter’s name
- Affiliation (agency/organization)
- Address
- Telephone number and email address
- SWGDE Document title and version number
- Change from (note document section number)
- Change to (provide suggested text where appropriate; comments not including suggested text will not be considered)
- Basis for suggested modification
Intellectual Property
Unauthorized use of the SWGDE logo or documents without written permission from SWGDE is a violation of our intellectual property rights.
Individuals may not misstate and/or over represent duties and responsibilities of SWGDE work. This includes claiming oneself as a contributing member without actively participating in SWGDE meetings; claiming oneself as an officer of SWGDE without serving as such; claiming sole authorship of a document; use the SWGDE logo on any material and/or curriculum vitae.
Any mention of specific products within SWGDE documents is for informational purposes only; it does not imply a recommendation or endorsement by SWGDE.
1. Purpose
This document provides a general awareness of FFmpeg (Fast Forward mpeg), its functions, basic use, and common uses as it pertains to digital video forensics. FFmpeg is an open source, cross-platform framework that uses a command line to play, convert, and stream audio and video. This framework is used in multiple applications for forensic and commercial purposes.
2. Scope
The intended audience is forensic analysts/examiners seeking direction and familiarization in the use of FFmpeg’s open-source suite. It focuses on basic commands and principles, as well as some commands commonly used in forensic analysis. The nature of FFmpeg is that it is constantly being collaborated and expanded. As more commands prove useful, they can be added to this document.
3. Limitations
This document was prepared with the resources available at the time of publication. As with all technology, FFmpeg is a constantly evolving environment with frequent implementation of new features and innovations, as well as some deprecations. The specific configuration of any specific installation will vary widely and may not conform to the tasks cited here.
This document is not intended for use as a step-by-step guide for conducting a thorough forensic investigation, nor is it legal advice. While FFmpeg will process many codecs, it may not accurately decode some proprietary containers. When data cannot be decoded by the program, it may revert to default settings (e.g., frame rate from a proprietary container not decoded will display at 25 FPS). Additionally, FFmpeg will revert to defaults in conversion processes when certain parameters are not specified (e.g., quantization levels when transcoding). This document also does not address all commands available in FFmpeg, which can be addressed in FFmpeg’s documentation. Refer to the FFmpeg website (https://www.FFmpeg.org) for the full documentation. The website documentation refers only to the most current version. Therefore, it is recommended that notes be kept on the version implemented within your laboratory.
FFmpeg is licensed under the GNU Lesser General Public License (LGPL) version 2.1 or later and incorporates several optional parts and optimizations that are covered by the GNU General Public License (GPL) version 2. FFmpeg supports many encoding technologies, some of which might be subject to some patent rights in some jurisdictions. Review the license and legal considerations.
This is not a best practices guideline and should not replace proper training and tool validation.
4. FFmpeg tools
FFmpeg is an open-source platform that can be implemented across most operating systems. The base function of the platform is to leverage multiple libraries of codecs to gain insight into multimedia files as well as allow playback, streaming, and conversion of multimedia files. In forensic analysis, FFmpeg can be utilized to inspect metadata and play and examine native files without transcoding. Additionally, it can be used to process files for further analysis or demonstrative work. In addition to these processes, there are many other ways a forensic analyst/examiner can utilize FFmpeg as a toolkit.
To get started, it is important to understand that FFmpeg, the platform, contains three command line tools with unique functions. In this document “FFmpeg” refers to the application framework. The individual command line tools are all lowercase.
4.1 ffprobe
A multimedia tool that provides metadata about digital multimedia including, but not limited to, duration, frame rate, frame size, aspect ratio, codec, streams (video, audio, and data), etc.
4.2 ffplay
A media player that utilizes the FFmpeg framework to display multimedia files. While not all encompassing, it will play proprietary and open-source media files.
4.3 ffmpeg
A command line tool to convert multimedia file formats as well as various properties within the file, such as codecs, container, frame rate, aspect ratio, and still images.
5. FFmpeg installation
5.1 Windows installation
- Download the latest static version from http://ffmpeg.org/download.html
- Use 7-zip compatible software to “extract all” from the downloaded file, which will put everything in one folder (7-zip is available here: https://www.7-zip.org/)
- On the C: drive, create a folder named “ffmpeg”
- Copy everything from the extracted folder into the “ffmpeg” folder on the C: drive
- Right click on the Windows button. Select “Control Panel”, then “System and Security”, then “System”, then “Advanced System Settings”
- Click on “Environment Variables”
- Under “User Variables for User”, click “New” (may require administrative rights)
- Under “Variable Name”, type the word “Path”
- Under “Variable Value”, type “c:\ffmpeg\bin”
- Click “Ok”
5.2 Mac installation
Homebrew is a command-line package manager that will automatically install and attach dependencies. Using Homebrew requires an intel-based Apple computer, prior installation of Xcode, an internet connection, and installation of Homebrew first. The steps below will address the installation of Homebrew and FFmpeg.
- In Terminal, type:
- /usr/bin/ruby -e “$(curl -fsSL https://raw.githubusercontent.com/Homebrew/install/master/install)”
- Follow the on-screen instructions; this will take a few minutes while it is installing the necessary developer tools for OS X
- After successful installation, run: brew install ffmpeg to get the latest released version and library dependencies
- To see additional installation options, run: brew info ffmpeg
- These may include: brew install ffmpeg
- ––with-fdk-aac
- ––with-ffplay
- ––with-freetype
- ––with-libass
- ––with-libquvi
- ––with-libvorbis
- ––with-libvpx
- ––with-opus
- ––with-x265
- To update ffmpeg, run: brew update && brew upgrade ffmpeg
- Note: For these instructions and additional options visit: https://trac.ffmpeg.org/wiki/CompilationGuide/MacOSX
6. FFmpeg informational commands
The following command line options are usable with any of the executables (ffmpeg, ffprobe, ffplay). In the examples below, only ffmpeg will be shown. These informational commands are useful for tool validation and case note documentation.
6.1 Help (-h)
ffmpeg -h
The –h option displays general help or can be used with arguments to get function-specific help.
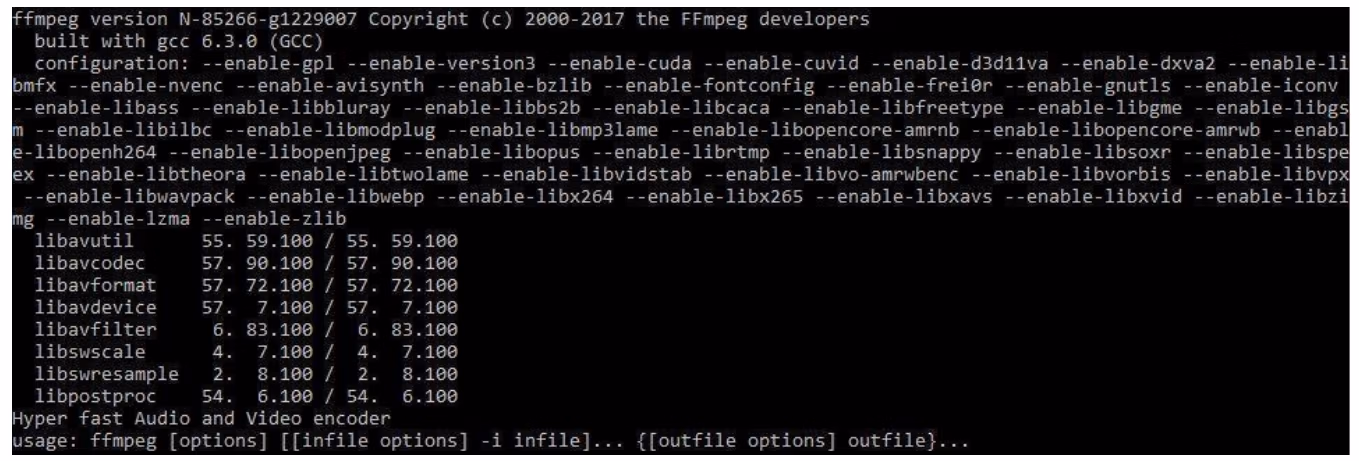
6.2 Show license (-L)
ffmpeg -L
The –L option displays the version number, the compiler, the enabled libraries, and the library version numbers of required libraries.
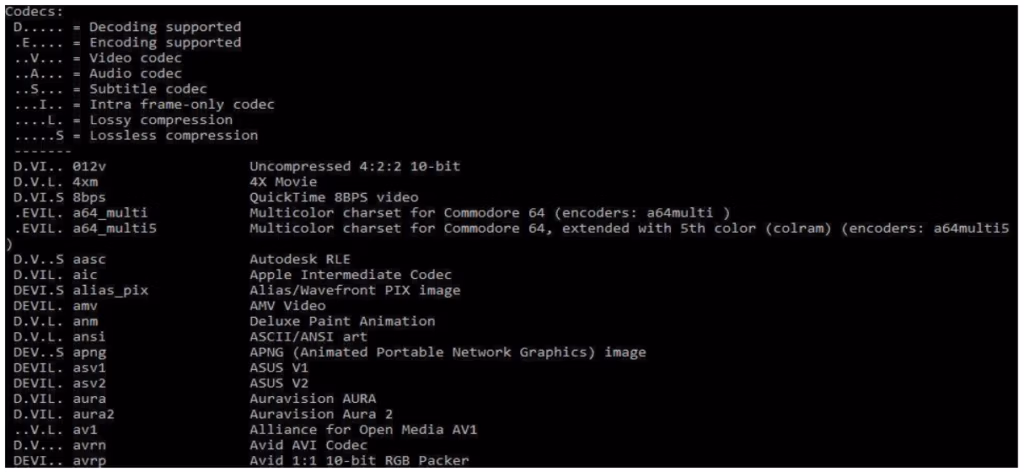
6.3 Installed codecs (-codecs)
ffmpeg -codecs
The –codecs option lists all the media bitstream formats supported by the libavcodec library, a key required library of FFmpeg.
6.4 Available formats (-formats)
ffmpeg -formats
The –formats option lists all the file formats available to FFmpeg. The list indicates whether each format supports stream multiplexing or demultiplexing.
7. Basic command entry format
In this document, all input files will be referred to as “input.dvr”.
7.1 ffprobe
ffprobe input.dvr
ffprobe
Starts the command
input.dvr
Gives the location of the file

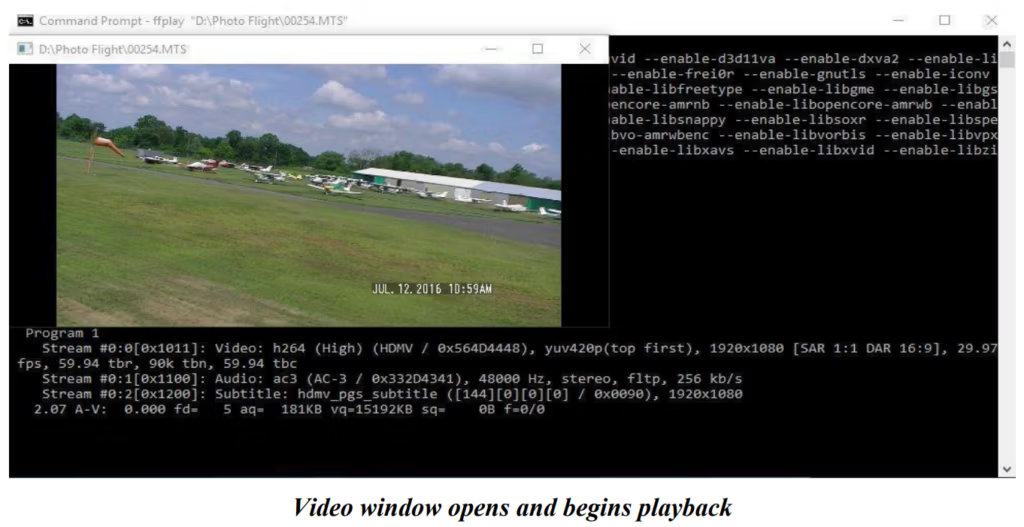
7.1.1 Explanation of results
- Input
- Indicates the file number (#0), starting from 0, the file container format (mpegts [MPEG Transport Stream]), and the input file path (D:\Photo Flight\00254.MTS)
- Duration
- Shows the duration of the file (00:00:43.46), the start time of the container (1.033367) in seconds, and the bitrate of the file (23760 kb/s)
- Program
- Indicates that the MPEG Transport Stream has a Program Stream (1) and it contains the streams that follow it
- Stream
- Shows the streams in the file and their corresponding stream numbers. This instance has 3 streams: stream #0:0, which is identified as video, stream #0:1, which is identified as audio, and stream #0:2, which is identified as subtitles
- Video
- Displays the codec used to encode the stream (h264 [H.264/MPEG-4 AVC]), the profile (High), the codec 4CC (HDMV), the pixel encoding (yuv420p [YUV 4:2:0]), the field interlacing (top first), the image dimensions (1920×1080) with screen (pixel) aspect ratio (SAR 1:1) and display aspect ratio (DAR 16:9), frame rate (29.97 fps), and additional time base information (59.94 tbr, 90k tbn, 59.94 tbc)
- Audio
- Displays the codec and 4CC used to encode the audio stream (ac3, AC-3), audio sampling rate (48000 Hz), channel configuration (stereo), audio sample format (fltp [floating point]), and audio bitrate (256 kb/s)
- Subtitle
- Displays the codec and 4CC used to encode the subtitle text stream (hdmv_pgs_subtitle, 0x0090), and the image size (1920×1080)
7.1.2 Stream and format details
ffprobe -show_format -show_streams input.dvr
The −show_format option shows detailed properties and metadata of the container format. The −show_streams option shows detailed properties and metadata of each stream.
7.1.3 Frame details
ffprobe -show_frames input.dvr
The –show_frames option reports details about each frame.
7.2 ffplay
ffplay input.dvr
ffplay
Starts the command
input.dvr
Gives the path and name of input file
7.2.1 ffplay controls for operation of playback window
- Pause/Play: P key or Spacebar
- Scrub forward: On the video window, right-click and drag mouse to the right
- Scrub backward: On the video window, right-click and drag mouse to the left
- Frame forward: S key
- Display audio waveform: W key
- Toggle view of waveform or spectral frequency display: W key
- Full screen: F key
- To quit or close window: Q key or ESC key
- To mute: M key
- Set Volume: Press and hold the 9 key to lower volume or 0 key to increase volume
- Decrease/Increase volume: / and * respectively
- Cycle audio streams: A
- Cycle video streams: V
- Cycle subtitle streams: T
- Cycle program: C
- Seek backward/forward 10 seconds: Left/Right keys
- Seek backward/forward 1 minute: Down/Up keys
- Seek backward/forward 10 minutes: Page Down/Page Up
7.2.2 Forcing a format (–f)
If multimedia does not play, instruct ffplay to force the format of the video file. The example below is forcing the “h264” format. This command is also available within ffprobe and ffmpeg.
ffplay –f h264 input.dvr
ffplay
Starts the command
-f h264
Forces the format to h264. Other commonly used video formats include but are not limited to:
- H264
- M4V
- MJPEG
- MPEG2
- H263
For a list of other formats available in ffplay type: ffplay -formats
input.dvr
Gives the path and name of input file
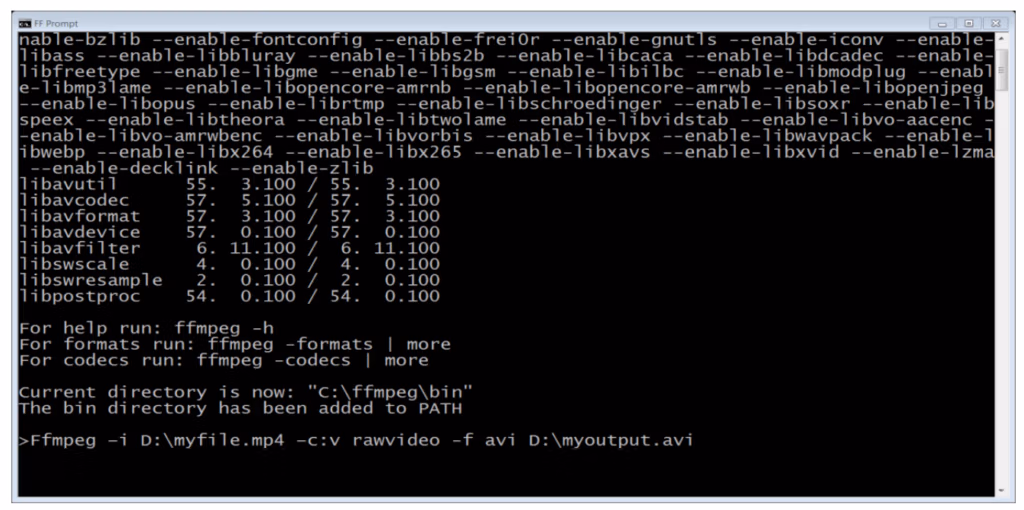
8. ffmpeg
This is the basic command structure for ffmpeg; all other commands will follow this structure:
[Call Program][input Arguments]-i[Input File][Output Arguments][Output file]
For example, this command plays the inputted file at 10 frames per second and transcodes it to an uncompressed AVI.
ffmpeg
Starts the command
-r 10
Tells ffmpeg the video input should be played at 10 frames per second
-i input.dvr
Gives the path and name of input file
-c:v rawvideo
Tells ffmpeg to transcode the video stream to an uncompressed video format
-f avi
Tells ffmpeg to wrap the video in an AVI container with necessary header information
output.avi
Path and name of output file
9. Commonly used ffmpeg commands
Due to the nature of video examinations, there are many times when a file does not contain an audio stream. As such, commands that include audio and video will be included in a separate section.
While it is possible to utilize ffmpeg without including input or output arguments, doing so will require ffmpeg to make decisions based on the application’s defaults. As such, the default settings chosen by ffmpeg may not be optimal for most forensic purposes.
9.1 Copy original streams into an MP4 container
ffmpeg -i input.dvr -c copy output.mp4
ffmpeg
Starts the command
-i input.dvr
Give the path and name of input file
-c copy
Tells ffmpeg to copy the original video, audio, and any subtitle stream data without transcoding
output.mp4
Path and name of output file.
9.2 Transcode a video stream to uncompressed AVI
ffmpeg -i input.dvr -c:v rawvideo -f avi output.avi
ffmpeg
Starts the command
-i input.dvr
Path and name of input file
-c:v rawvideo
Tells ffmpeg to transcode the video stream to an uncompressed video format
-f avi
Tells ffmpeg to wrap the video in an AVI container with necessary header information
output.avi
Path and name of output file
9.3 Transcode into visually lossless h.264 mp4
ffmpeg -i input.dvr -c:v h264 -qp 0 output.mp4
ffmpeg
Starts the command
-i input.dvr
Gives the path and name of input file
-c:v h264
Tells ffmpeg to transcode the video stream to an h.264 video format
-qp 0
Tells ffmpeg to look for high-frequency changes to a macroblock and allow for variance based on the set parameters. If no parameter is set, the default quantization parameter is 23. When set at 0, no quantization is permitted and any change in a block requires a full new block.
output.mp4
Path and name of output file
9.4 Transcode into mathematically lossless FFv1 mp4
ffmpeg -i input.dvr -c:v ffv1 output.mkv
ffmpeg
Starts the command
-i input.dvr
Gives the path and name of input file
-c:v ffv1
Tells ffmpeg to transcode the video stream to an ffv1 video format
Note: While this is a lossless video encoding format, there may be compatibility issues with non-FFmpeg based video players
output.mkv
Path and name of output file. For compatibility, AVI and MKV are acceptable containers for FFv1
9.5 Force ffmpeg to read file with a specific codec and change the file container
ffmpeg -f h264 -i input.dvr -c:v copy -f avi output.avi
ffmpeg
Starts the command
-f h264
Tells ffmpeg the video stream should be forced to play as h264, regardless of file data; other common dvr codecs are mjpeg, h263, and m4v
-i input.dvr
Gives the path and name of input file
-c:v copy
Tells ffmpeg to copy the inputted video codec
-f avi
Tells ffmpeg to wrap the video in an AVI container with necessary header information
output.avi
Path and name of output file
9.6 Change the framerate and the file container
ffmpeg -r 10 -i input.dvr -c:v copy -f avi output.avi
ffmpeg
Starts the command
-r 10
Tells ffmpeg the video input should be played at 10 frames per second. This can come after the input file, but that is not forensically recommended, as that tells ffmpeg to play the output file at the listed frame rate, potentially adding frames to pad.
-i input.dvr
Gives the path and name of input file
-c:v copy
Tells ffmpeg to copy the inputted video codec
-f avi
Tells ffmpeg to wrap the video in an AVI container with necessary header information
output.avi
Path and name of output file
9.7 Output all video file I-frames to uncompressed sequential still images
ffmpeg -i input.dvr -vsync drop -vf select=’eq(pict_type\,I)’ -f image2 -pix_fmt rgb24 foldername\frame%05d.tiff
ffmpeg
Starts the command
-i input.dvr
Gives the path and name of input file
-vsync drop
Video sync option which tells ffmpeg to disregard timestamp information
-vf select=’eq(pict_type\,I)’
Tells ffmpeg to apply a video filter that selects frames based on a picture type, in this case, I-frames. Other options include “P” for P-frames, and “B” for B-frames. Can be combined by a comma delimiting the parameter.
-f image2
Tells ffmpeg to encode the selected image type(s) into an image sequence
-pix_fmt rgb24
Tells ffmpeg to format the images as 24-bit RGB images; other useful options include “bgr24” and “yuv420p”
foldername\frame%05d.tiff
Specifies an output folder and a title for the images numbered in a 5-digit sequence as TIFF files
9.8 Output individual frames from video stream
ffmpeg -i input.[extension] -an -f image2 output_%05d.[extension]
ffmpeg
Starts the command
-i input.[extension]
Path and name of input file
-an
Tells ffmpeg to exclude any existing audio tracks in the file
-f image2
Tells ffmpeg to extract still images for each frame of video
output %05d.[extension]
Path and name of output file, the extension will force the still image extraction to a desired still image format (e.g., .jpg, .tiff, or .png); the “%05d” modifier represents a five-digit, zero-padded incrementing counter
9.9 Export a portion of the file as an uncompressed avi
ffmpeg -ss 0:00:10.000 -i input.dvr -t 0:00:05.000 -c:v rawvideo output.avi
ffmpeg
Starts the command
-ss 0:00:10.000
Tells ffmpeg to seek to a time in the video using the format hours:minutes:seconds.milliseconds
-i input.dvr
Gives the path and name of input file
-t 0:00:05.000
Tells ffmpeg to play for a specific amount of time. The format is the same as -ss
-c:v rawvideo
Tells ffmpeg to transcode the video stream to an uncompressed video format
output.avi
Path and name of output file
9.10 Concatenate common files into an avi
There are some caveats with concatenation. Before concatenating, all videos should be from the same source, with the same frame rate and the same codec. The basic command for this is:
ffmpeg -i "concat:input1.dvr|input2.dvr|input3.dvr" -c copy output.dvr
ffmpeg
Starts the command
-i “concat:input1.dvr|input2.dvr|input3.dvr”
Tells ffmpeg to combine the files in the order they are entered; ffmpeg will start with the first file in the list and continue until the last file is completed
-c copy
Tells ffmpeg to copy the original video, audio, and any subtitle stream data without transcoding
output.dvr
Path and name of output file
Alternatively, the input can be done from a text file. The text in the list needs to be structured as follows:
file ‘input1.dvr’
file ‘input2.dvr’
file ‘input3.dvr’
The following Windows command can be used to automatically create the text file above.
(for %i in (*.dvr) do @echo file '%i') > list.txt
Once a text file has been created, use the following command to combine all listed files into one file.
ffmpeg -f concat -i list.txt -c copy -f avi output.avi
ffmpeg
Starts the command
-f concat
Tells ffmpeg to concatenate all the files in the input
-i list.txt
Is the path and name of the list.txt file; ffmpeg will start with the first file in the list and continue until the last file is completed
-c copy
Tells ffmpeg to copy the original video, audio, and any subtitle stream data without transcoding
-f avi
Tells ffmpeg to wrap the video in an AVI container with necessary header information
output.avi
Path and name of output file
One note from ffmpeg documentation: If using MP4 files, these could be losslessly concatenated by first transcoding them to mpeg transport streams. With h.264 video and AAC audio, the following commands can be used:
ffmpeg -i input1.mp4 -c copy -bsf:v h264_mp4toannexb -f mpegts temp1.ts
ffmpeg -i input2.mp4 -c copy -bsf:v h264_mp4toannexb -f mpegts temp2.ts
ffmpeg -i "concat:temp1.ts|temp2.ts" -c copy -
bsf:a aac_adtstoasc output.mp4
9.10.1 Explanation of novel commands
-bsf:v h264_mp4toannexb
The –bsf option specifies a bit stream filter. The “:v” specifier signals to apply the filter to the video stream. Here, the “h264_mp4toannexb” option is required for the conversion to MPEG-2 Transport Streams, which can be concatenated.
-bsf:a aac_adtstoasc
This option applies the “aac_adtstoasc” bit steam filter to the audio stream, which is required for conversion from MPEG-2 Transport Stream to MPEG-4.
10. Commonly used ffmpeg audio commands
Below are some commonly used commands that will assist the video examiner with audio included within a multimedia file. For more information on audio specific commands, please see SWGDE Technical Notes on FFMPEG in Forensic Audio Examinations.
10.1 Output only audio to an uncompressed format
This command extracts or transcodes the evidence audio stream into a WAV PCM file.
ffmpeg -i input1.dvr -map 0:a output.wav
ffmpeg
Starts the command
-i input.dvr
Gives the path and name of input file
-map 0:a
Selects all audio streams
output.wav
Path and name of output file
If an encoding scheme is not specified for the output WAV file, FFmpeg currently defaults to 16-bit signed pulse code modulation (PCM) (little-endian byte order). Therefore, if the audio stream of the input file is encoded at 24- or 32-bit, an additional switch should be added to the command to preserve the original quantization (e.g., “-c:a pcm_s24le” for 24-bit signed). Channel configuration and audio sampling rate are retained from the audio stream of the input file.
10.2 Output AVI with uncompressed video and audio
ffmpeg -i input.dvr -c:a pcm_s16le -c:v rawvideo -f avi output.avi
ffmpeg
Starts the command
-i input.dvr
Gives the path and name of input file
-c:a pcm_s16le
Tells ffmpeg to transcode the audio stream to an uncompressed 16-bit audio format
-c:v rawvideo
Tells ffmpeg to transcode the video stream to an uncompressed video format
-f avi
Tells ffmpeg to wrap the video in an AVI container with necessary header information
output.avi
Path and name of output file
10.3 Mapping (or combining) clarified audio to a video file
ffmpeg –i input1.dvr –i input2.wav –map 0:v –map 1:a –c copy output.avi
ffmpeg
Starts the command
-i input1.dvr
Path and name of input video file having one video stream
-i input2.wav
Path and name of input clarified audio file having one audio stream
-map 0:v
Select the video stream from input1.dvr.
-map 1:a
Select the audio stream from input2.wav
-c copy
Tells FFmpeg to copy the original video and audio stream data from the respective input files without transcoding.
output.avi
Path and name of output file
11. Forensic analysis commands
11.1 Understanding h.26x macroblocks
11.1.1 Create a MP4 video with a visual display of macroblock types
Note: Decoding of macroblock types is MPEG-specific. This has been deprecated in FFmpeg builds after 3.4.2.
ffmpeg -debug vis_mb_type -i input.dvr output.mp4
ffmpeg
Starts the command
-debug vis_mb_type
Tells ffmpeg to visualize block types
-i input.dvr
Path and name of input file
output.mp4
Path and name of output file (MP4 format)
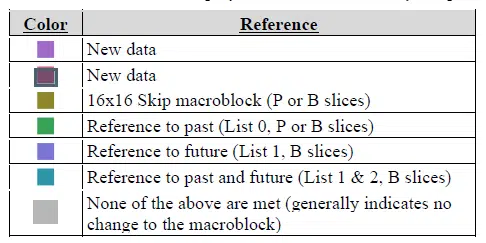
11.1.2 Macroblock analysis visual display reference chart
Note: Colors below are displayed in the order that they are parsed.
11.1.3 Create an MP4 video with visual display of macroblock movements (i.e., motion vectors)
Note: Decoding of macroblock types is MPEG-specific. This tool works in FFmpeg builds after 3.4.2.
ffmpeg -flags2 +export_mvs -i input.dvr -
vf codecview=mv=pf+bf+bb output.mp4
ffmpeg
Starts the command
-flags2
Allows the use of export_mvs (below) as an option to export motion vector information
+export_mvs
Defines the debug option that exports motion vectors based on requested parameters (e.g., codecview)
-i input.dvr
Path and name of input file
-vf
States the upcoming command will be filter that will be applied to the video
Note: This will no longer strictly be the original video; resultant products will be transcoded.
codecview
This filter is applied to show motion vectors as small arrows for each macroblock. It has one option, mv (below), that can be used with it.
mv
Defines the motion within frames the resultant video will visualize. These will be displayed as arrows from the previous location of the macroblock. The options for visualizing frames are:
‘pf’ = forward predicted MVs of P-frames
‘bf’ = forward predicted MVs of B-frames
‘bb’= backward predicted MVs of B-frames
output.mp4
Path and name of output file (MP4 format)
11.2 Variable frame rate (VFR)
This command identifies the presence of a variable frame rate in the input file. It should not be used to determine the actual variance, only to identify the presence of a VFR and the number of frames that are variable.
ffmpeg -i input.dvr -vf vfrdet -f null -
ffmpeg
Starts the command
-i input.dvr
Path and name of input file
-vf
States the upcoming command will be filter that will be applied to the video
vfrdet
Determines if there is any variance between individual frame times.
-f null
Pass the video source unchanged to the output.
VFR:0.000296 (8/26975) min: 48000 max: 1392000)
VFR
Identifies the number of frames in the video file that have different frame timing from others. In this example 8 of the 26975 frames have different intervals, which is 0.000296 of the total frames.
min / max
If present, this displays the minimum and maximum frame timing variance from the constant stream in the video’s timebase; however, this is not an actual measure of time in seconds. It is recommended to utilize the frame information report to determine frame time variance within a file.
11.3 Frame information report
This report shows time and display information for each frame in a video.
ffprobe -show_frames -print_format xml input.dvr > output.xml
ffprobe
Starts the command
-show_frames
Shows information for each frame
-print_format xml
Tells ffprobe to send frame information into an XML file
input.dvr>output.xml
Gives the name of the input file and path, and sends it to the listed output.xml name and path
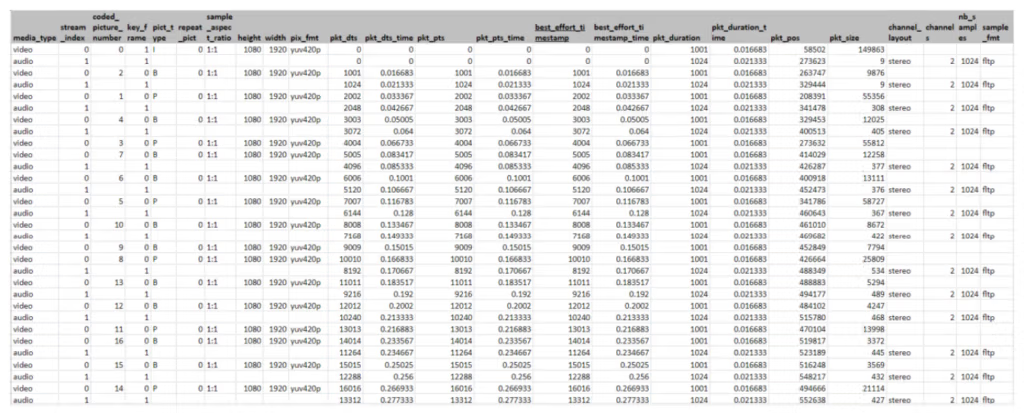
11.3.1 Frame information guidance
Note: The list below and their definitions are not all inclusive and are most frequently seen or used when interrogating media with video and audio.
Media Type (media_type): This identifies the media type of the frame (e.g., video, audio).
Stream Index (stream_index): This identifies the stream number, which is a numeric identifier for the media type in the context of the file being parsed.
Coded Picture Number (coded_picture_number): This value corresponds to the sequence in which a video frame will be decoded.
Display Picture Number (display_picture_number): This value corresponds to the sequence in which a video frame will be presented.
Key Frame (key_frame): Identifies whether the current frame is a Key Frame (or I frame).
Picture Type (pict_type): Reports the temporal compression of the frame listed as either a B, P, or I frame.
Repeat Pict (repeat_pict): Denotes the number of times this frame will be repeated when displayed during playback. If value (n) is greater than 0, the frame duration will be multiplied by a value of n+1.
Sample Aspect Ratio (sample_aspect_ratio): Reports the pixel space needed for the display aspect ratio. 0/1 is reported if it is unknown or unspecified.
Height: The amount of pixels in the vertical direction of the frame.
Width: The amount of pixels in the horizontal direction of the frame.
Pixel Format (pix_fmt): Contains information as it pertains to the color space, chroma subsampling, and the field references. In the given example the color space is defined as YUV, the chroma subsampling samples 4:2:0 and decodes as a progressive image with both fields displayed together.
Timestamps (pkt_dts, pkt_dts_time, pkt_pts, pkt_pts_time best_effort_timestamp, best_effort_timestamp_time): There are multiple timestamps displayed in this export, depending on information available in the file structure. It should be noted that these are informed by the metadata and may not be the same once a file is played or decoded. As such, Best Effort Time Stamp, and DTS (or decode timestamp) may be inconsistent between ffprobe and ffplay. PTS (Presentation time stamp) and pkt_duration report most accurate ffprobe information for the timing intended for playback. Columns ending in “time” demark the amount of time in seconds, while others demark time in the stream timescale.
To extract accurate DTS and PTS for the file (for uses such as determining frame rate), use a command that attempts to decode and present the target file. For example, the following will display the timing information within the command line:
ffmpeg -i input.dvr -dump -map 0:v -f null -
Packet Duration (pkt_duration): The amount of time in stream timescale that the packet is to be presented.
Packet Duration in Time (pkt_duration_time): The amount of time in seconds that the packet is to be presented.
Packet Position (Pkt pos): Location in the file from 0 to the packet.
Packet Size (Pkt size): Size in bytes of the corresponding packet containing the compressed frame.
Channel Layout (channel_layout): Documents the formation of audio represented in the stream, e.g., mono, stereo.
Channels: Number of channels in the audio packet.
Number of Samples (nb_samples): Number of stream samples per packet.
Sample Format (sample_fmt): Denotes the method of decoding the audio samples in the packet.
12. Validation
12.1 Frame-level MD5
This procedure provides a methodology for verifying lossless changing of a codec from one container to another container while utilizing the md5 algorithm. First, generate md5 values for every frame/sample in a file. Then, change the container of the file into a new container (e.g., AVI, MOV). Then create md5 values for the new file. Finally, compare the two sets of frame md5 values to prove that the video/audio information has not changed during the container changing process. The following sections provide instructions for this process.
12.1.1 Generate md5 values for every frame in a video file
First use ffmpeg to create a text file that includes an md5 value for each frame in the first file that you want to compare.
ffmpeg -i input.dvr -f framemd5 file1.md5.txt
ffmpeg
Starts the command
-i input.dvr
Path and name of the input file
-f framemd5
Instructs ffmpeg to create md5 hash values for each frame/sample of data
file1.md5.txt
Instructs ffmpeg to output the result of the frame md5 to a particular text file
12.1.2 Compare the two sets of frame md5 values
To compare the two files, use a comparison technique to compare the text of the two frame md5 files to look for any differences in them. If there are no differences, then you have an exact match in frame count, frame size, and byte order per frame.
FC file1.md5.txt file2.md5.txt > result.txt
FC
FC is a Windows operating system command to compare the textual content of two specified files
file1.md5.txt
Specifies the first input file
file2.md5.txt
Specifies the second input file
> result.txt
Instructs FC to output the result of the comparison to a particular text file
12.1.3 Stream comparison with MD5
To confirm two multimedia streams are identical, regardless of other file contents and metadata, the decoded audio or video data can be forced through the MD5 calculation. The result is a hash of the decoded multimedia payload. The following is an example for use in forensic casework to confirm the uncompressed conversion of an audio stream from a video file has successfully produced identical data when decoded.
ffmpeg -i input.mov -map 0:a:0 -acodec pcm_s16le output.wav
ffmpeg -i input.mov -map 0:a:0 -f streamhash -hash md5 -
MD5=f65a7bd48e9bbdc29c079900a7a4ea10
ffmpeg -i output.wav -f streamhash -hash md5 -
MD5=f65a7bd48e9bbdc29c079900a7a4ea10
12.1.3.1 Explanation of novel commands
-f streamhash
Tells ffmpeg to compute the hash of the audio (because it is currently mapped) and output the result to the command window. Note that if a file contains multiple streams, the stream needs to be specified or the stream hash will apply to the entire file. This can also be applied to video streams.
-hash md5
The –hash option with the “md5” parameter sends the stream hash through an MD5 hash algorithm, which computes a single hash for the entire stream. The default algorithm for -f streamhash is SHA-256
– (stdout)
Using a hyphen as the output file directs the output of the command to standard output, which appears on the screen.
13. Processing Multiple Files in Scripts
Processing multiple files provides a level of automation which utilizes the ffmpeg commands outlined above. Batch processing of files can be achieved using your preferred tool. For use in the Windows operating system, a batch script, for example, allows a set of commands to be automated, and is saved in a .bat container. If in the Macintosh operating system, a BASH script can be written and executed within the Terminal, and a Python script can run in either environment. When executed, the script applies the individual commands to a single file, folder, or directory.
Note: The script can be written using a text editor (.txt) format and saved as a .bat extension. Then you can simply double-click it to run the script as a batch process in Windows.
13.1 Example
The following batch file example below stream copies all of the files with the *.mp4 files extension to an .mkv format using the FFmpeg library.
@Echo off
Title Reindexing your MP4 files
::Making sure the file is in the right folder
Set /p location=For this script to work, it should be in the same folder the
files are in. Are you Ready (y/N):
if /I “%location%”==”N” (
Echo Please move this file to the location of the videos
Pause
exit
)
::using the provided information to stream copy the file
for %%F in ( .\*.mp4 ) do
“C:\ffmpeg\bin\ffmpeg.exe” -i “%%~fF” -c copy -an “%%F.mkv”
Echo All your MP4 files should play as mkv’s, verify their playback.
13.2 Explanation of novel Batch commands
@echo off
disables the output of the command within the console.
::
Comments to the user within the bat script document
Echo
displays a desired string passed to it as an argument
pause
Suspends processing of the batch program and terminates cmd.exe upon first button press
Set /p =
Allows the user to interact with the script and set a temporary variable
If
Creates a conditional statement, in this case, it is looking at the value of a variable, and making a decision based on that value
%%F
Uses the file name
%%~fF
Uses the full file name with path
for
Creates a ‘For’ loop cycling through the the names of files looking for an extension
do
Instructs the computer to run the next section as a Command Line Prompt instead of a Batch command
14. History
| Revision | Issue Date | History |
|---|---|---|
|
1.0 DRAFT |
9/15/2016 |
Initial drafted and SWGDE voted to release as a Draft for Public Comment. |
|
1.0 DRAFT |
10/8/2016 |
Formatted and technical edit performed for release as a Draft for Public Comment. |
|
1.0 DRAFT |
1/12/2017 |
Added Section 7.3.5.2 Output individual frames from video stream. Added Section 7.4 Commonly Used FFMPEG Audio Commands. Added 8.4 Frame-level MD5. SWGDE voted to re-release as a Draft for Public Comment. |
|
1.0 DRAFT |
2/21/2017 |
|
|
1.0 DRAFT |
5/30/2017 |
Updated all images with new, original images. Re-released as a Draft for Public Comment. |
|
1.0 DRAFT |
6/22/2017 |
SWGDE voted to publish as Approved, pending completion of 60-day draft period if no additional comments are received. |
|
1.0 |
7/31/2017 |
Formatting and technical edit performed and published as Approved version 1.0. |
|
1.0 |
6/14/2018 |
Adjusted wording and organization throughout for clarity. Added sections to account for deprecated commands. Added insight for output formats and the Frame Information report. Incorporated audio specific functions. SWGDE voted to release as a Draft for Public Comment. |
|
2.0 |
7/9/2018 |
Formatted and technical edit performed for release as a Draft for Public Comment. |
|
2.0 |
9/14/2021 |
Update the Output Audio Only from a File, FFmpeg command line |
|
2.1 |
6/9/2022 |
Adjusted format. Clarified some audio commands. Updated references as former links have been deprecated. |
|
2.2 |
1/11/2022 |
Added 1 new video command, and clarified the stream hash command |
|
3.0 |
9/20/2023 |
Added BAT script examples and updated FFMPEG installation instructions |
|
3.0 |
3/22/2024 |
SWGDE voted to approve as Final Approved Document. Formatted for release as a Final Approved Document. |
Version: 3.0 (3/22/2024)